Crumb Widget
An embeddable NA meeting finder widget for any website.
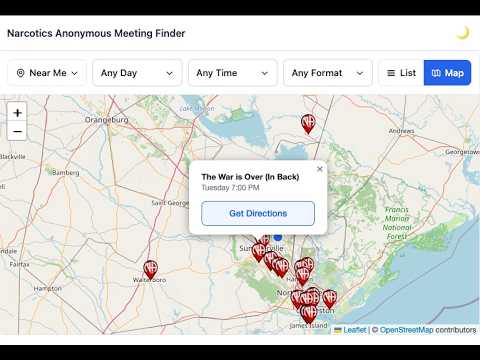
Live Demo GitHub QA Tests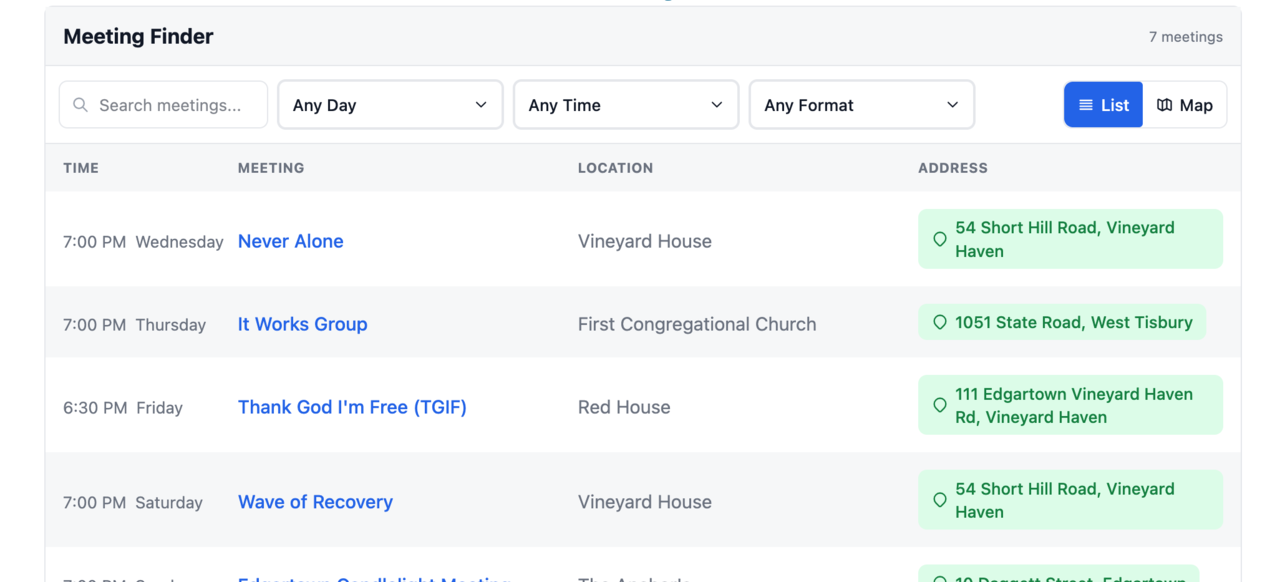
Crumb is a meeting finder you can add to your service body's website. Members type in a city, tap "Near Me," or browse a list and map to find an NA meeting — right on your site, no app required. It's free and open source.
Pick your platform
Whatever runs your service body's website, there's a way to add Crumb. Click the one that matches your setup:
Built for finding meetings, fast
Video tutorials
Short walkthroughs covering setup for WordPress and plain-HTML sites. Watch the full playlist on YouTube →


About Crumb
Crumb Widget queries a BMLT server (the database your area uses to store meeting info) and turns it into a friendly meeting finder on your site — with search, filters, a list, and an interactive map.
Under the hood it's a single JavaScript file. No stylesheets to manage, no setup steps, no developer required if you're using one of the plugins above.
Quick Start (Code Snippet)
If your site lets you paste in a small piece of HTML — like a Squarespace code block, a Wix HTML embed, or a plain web page — this is all you need. Replace the server URL with your service body's BMLT server, then paste the snippet anywhere on the page:
<!doctype html>
<html lang="en">
  <head>
    <meta charset="UTF-8" />
    <meta name="viewport" content="width=device-width, initial-scale=1.0" />
    <title>Meeting Finder</title>
  </head>
  <body>
    <div
      id="crumb-widget"
      data-server="https://myserver.com/main_server/"
      data-service-body="3"
    ></div>
    <script type="module" src="https://cdn.aws.bmlt.app/crumb-widget.js"></script>
  </body>
</html>
The widget initializes automatically when the script loads, so no additional JavaScript is needed.
Important: Be sure your page includes <meta name="viewport" content="width=device-width, initial-scale=1.0" /> in the <head>. This is
important for proper rendering on mobile devices and small screens.
Example: WordPress
The easiest way to add Crumb Widget to a WordPress site is the official Crumb plugin (GitHub). It wraps this widget in a shortcode with a settings screen — no code required.
Installation
- Search for Crumb in the WordPress plugin directory, or upload the plugin ZIP manually.
- Activate the plugin.
- Go to Settings → Crumb and enter your BMLT server URL.
- Add the shortcode to any page or post.
Shortcode
[crumb]The BMLT server URL set in the plugin settings is used by default. You can override it — or filter by service body — directly in the shortcode:
[crumb server="https://your-server/main_server" service_body="42"]Advanced configuration
All global config options (language, geolocation, columns, map tiles, etc.) can be set from your theme's functions.php via the
crumb_config filter:
add_filter( 'crumb_config', function( $config ) {
    return array_merge( $config, [
        'language'          => 'en',
        'geolocation'       => true,
        'geolocationRadius' => 20,
        'height'            => 800,
        'columns'           => [ 'time', 'name', 'location', 'address', 'service_body' ],
    ] );
} );
Switching from Crouton
The Crumb plugin is an alternative to the crouton plugin and can drop in without page edits. Install Crumb, then deactivate crouton — existing pages keep working.
-
Crouton shortcodes
[bmlt_tabs],[bmlt_map],[crouton_tabs], and[crouton_map]are registered automatically and translated to the Crumb widget — map shortcodes render withview="both", tabs withview="list". -
Shortcode attributes
root_server,service_body,service_body_1,formats, andreport_update_urlare mapped to their Crumb equivalents. - Crouton's saved settings (server URL, service body, format IDs, update URL) are used as fallbacks whenever the corresponding Crumb setting is empty. Open Settings → Crumb to confirm the inherited values and click Save Changes to persist them.
- If both plugins are active, crouton continues to handle its own shortcodes; Crumb only takes over once crouton is deactivated.
Example: Drupal
Add Crumb Widget to a Drupal 10.3+ or 11 site with the
Crumb
module. It wraps this widget in a placeable block, a [crumb] shortcode filter for body fields, and a render service for programmatic embedding. Releases are published at
github.com/bmlt-enabled/crumb-drupal/releases.
Installation
-
Download the latest
crumb.zipfrom the releases page. - Extract into
web/modules/contrib/(orweb/modules/custom/). - Enable:
drush en crumb, or via Extend in the admin UI. - Visit Configuration → Web services → Crumb and enter your BMLT server URL.
Embed via Block
The simplest path: place the Crumb meeting finder block (category: BMLT) in any region via Structure → Block layout. Per-block settings allow overriding server, service body, view, and geolocation.
Embed via shortcode in body fields
Enable the Crumb meeting finder shortcode filter on a text format (Configuration → Content authoring → Text formats and editors), then use:
[crumb]The BMLT server URL set in the module settings is used by default. You can override it — or filter by service body — directly in the shortcode:
[crumb server="https://your-server/main_server" service_body="42" view="map" geolocation="true"]Advanced configuration
All global config options (language, geolocation, columns, map tiles, etc.) can be set programmatically via hook_crumb_config_alter() in any custom
module:
function MYMODULE_crumb_config_alter(array &$config): void {
  $config = array_merge($config, [
    'language'          => 'en',
    'geolocation'       => TRUE,
    'geolocationRadius' => 20,
    'height'            => 800,
    'columns'           => [ 'time', 'name', 'location', 'address', 'service_body' ],
  ]);
}
Example: Joomla
Add Crumb Widget to a Joomla 4, 5, or 6 site with the
Crumb
extension. The package bundles a content plugin ({crumb} shortcode in articles) and a site module (for module positions), sharing one configuration. Releases are published at
github.com/bmlt-enabled/crumb-joomla/releases.
Installation
-
Download the latest
pkg_crumb.zipfrom the releases page. - In Joomla admin, go to System → Install → Extensions and upload the package zip.
- Enable the plugin: System → Plugins, search "Crumb", open Content - Crumb, set the BMLT server URL, save, and toggle status to Enabled. (Joomla ships content plugins disabled by default.)
Embed via shortcode in articles
With the content plugin enabled, drop the shortcode into any article body:
{crumb}The BMLT server URL set in the plugin options is used by default. You can override it — or filter by service body — directly in the shortcode:
{crumb server="https://your-server/main_server" service_body="42" view="map" geolocation="true"}Embed via Module
Publish the Crumb module to any module position via Content → Site Modules → New → Crumb. Per-module settings cover server URL, service body filter, default view, and CSS template.
Advanced configuration
For options that aren't surfaced as form fields (language, dark mode, custom map tiles, etc.), use the Widget Configuration (JSON) field on the plugin or module options panel. The JSON is parsed and emitted as window.CrumbWidgetConfig alongside the widget.
{
  "language": "en",
  "geolocation": true,
  "geolocationRadius": 20,
  "height": 800,
  "darkMode": "auto",
  "columns": ["time", "name", "location", "address", "service_body"]
}
Website Builders
Crumb Widget can also be embedded on common website builders, but the setup varies by platform.
Finding your Service Body ID
Every embed below filters meetings to a specific service body (area, region, or zone) by passing its numeric ID in data-service-body.
data-server and data-service-body.
data-server URL and the data-service-body ID in one place.
Google Sites
Google Sites supports embedding HTML, CSS, and JavaScript code using Insert → Embed → Embed code. You can also use a full-page embed if you want the meeting finder to live on its own page.
- Open your site in Google Sites.
- Click Insert → Embed.
- Choose Embed code.
- Paste your widget markup and script.
- Click Insert, then publish your site.
<div
  id="crumb-widget"
  data-server="https://myserver.com/main_server/"
  data-service-body="3"
></div>
<script type="module" src="https://cdn.aws.bmlt.app/crumb-widget.js"></script>
Note: In Google Sites, JavaScript must be included inside <script> tags when using the embed code option. Because Google Sites runs the widget inside a
proxied iframe, direct links to specific meetings (deep-linking) are not supported — but all in-widget navigation works normally.
See a live demo on Google Sites →
Squarespace
Squarespace embeds use a Code Block, which accepts raw HTML and JavaScript. Per Squarespace's documentation, Code Blocks with JavaScript enabled are available on the Core, Plus, Advanced, Business, Commerce Basic, and Commerce Advanced plans. The free Personal plan does not support JavaScript in Code Blocks.
Before you start, you need two values:
data-server— your BMLT server's/main_server/URL-
data-service-body— the numeric ID for your area, region, or zone (see Finding your Service Body ID)
- Log in to Squarespace and open the page where you want the meeting finder.
- Click Edit, then hover where you want the widget to go and click the + (Add Block) button.
- Search for and insert a Code block.
- In the Code block editor, make sure the Mode dropdown is set to HTML and that Display Source is off (otherwise Squarespace will show the raw tags instead of running the code).
- Paste the snippet below, replacing
data-serveranddata-service-bodywith your values. - Click outside the block to close it, then click Save. Publish the page if it is not already live.
<div
  id="crumb-widget"
  data-server="https://myserver.com/main_server/"
  data-service-body="3"
></div>
<script type="module" src="https://cdn.aws.bmlt.app/crumb-widget.js"></script>
Note: Squarespace renders Code blocks inside the normal page flow, so the widget will take up as much vertical space as it needs. If the preview looks empty, re-open the block and confirm that Display Source is off and the Mode is set to HTML. If you are on a plan that does not allow JavaScript in Code blocks, you will need to upgrade before the widget will load.
Wix
Wix splits the embed across two places: the widget's HTML container lives inside your page as an Embed HTML element (Wix calls this "Custom Embeds → Embed HTML" or "Embed a
Widget"), and the loader <script> goes in Settings → Custom Code so it only loads once per visit. Per Wix's documentation, Custom Code requires your site
to be published on a paid plan with a connected domain.
Before you start, you need two values:
data-server— your BMLT server's/main_server/URLdata-service-body— the numeric ID for your area, region, or zone (see Finding your Service Body ID)
Step 1 — Add the loader script (once per site):
- In your Wix dashboard, go to Settings → Advanced → Custom Code.
- Click + Add Custom Code.
- Paste the loader snippet below into the code box.
- Under Add Code to Pages, choose either All pages or just the page that will show the widget (loading it only where needed is faster).
- Set Place Code in to Body – end.
- Name it something like Crumb Widget loader and click Apply.
<script type="module" src="https://cdn.aws.bmlt.app/crumb-widget.js"></script>Step 2 — Add the widget container on the page:
- Open the page in the Wix Editor.
- Click + Add Elements → Embed Code → Embed HTML (in Wix Studio this is Embed & Social → HTML iframe/Embed).
- Drop the element where you want the widget to appear and click Enter Code.
- Paste the container snippet below, replacing
data-serveranddata-service-bodywith your values. -
Click Update. Resize the element to roughly the height you want — Wix's Embed HTML has a fixed size, so give it enough room (e.g.
800pxtall) for the meeting list and map. - Click Publish.
<div
  id="crumb-widget"
  data-server="https://myserver.com/main_server/"
  data-service-body="3"
></div>Data Attributes
All configuration is set as data-* attributes on the #crumb-widget div.
| Attribute | Description | |
|---|---|---|
| data-server | Required |
Full URL to your BMLT server.
Example: https://example.org/main_server
|
| data-service-body | Optional |
Filter meetings to one or more service bodies. Accepts a single numeric ID or a comma-separated list. Omit to show all meetings on the server.
Single: "42" Multiple: "42,57,103" Note: recursive lookup is always enabled — child service bodies are automatically included and cannot be disabled. |
| data-format-ids | Optional |
Lock the widget to meetings matching one or more format IDs (numeric, server-specific). The filter is applied at the BMLT API level, so only matching meetings are
fetched. Useful when you want to embed a list of, e.g., only Open meetings.
Single: "4" Multiple: "4,7,12" (AND — meetings must match all listed IDs)
Format IDs vary per server. Look them up in BMLT admin or via GetFormats. For server-agnostic filtering by code (e.g. O, BT), use the
formats global config option instead.
|
| data-view | Optional |
Default view when the widget loads.
Values: list (default), map, or both both shows a fixed-height map above the full meeting list with no
list/map toggle. Can be overridden at runtime by the ?view= query parameter (see URL Query Parameters).
|
| data-columns | Optional |
Comma-separated list of columns to show in list view. Same allowed values as the columns global config option:
time, distance, name, location, address, service_body. Overridden by
CrumbWidgetConfig.columns when both are set. Example: data-columns="time,name,address"
|
| data-path | Optional |
Enables History API routing (clean URLs without #) and sets the base path. Without this attribute, hash-based routing is used (default). Example: data-path="/meetings" produces URLs like /meetings/monday-night-meeting-42 Use data-path="" for path routing with no prefix (e.g. in
iframe embeds). See Routing for details. |
| data-geolocation | Optional |
Enable or disable location-based search (the Near Me button and typed-location search). Takes precedence over
CrumbWidgetConfig.geolocation. Default: false for most servers, true when data-server points at
aggregator.bmltenabled.org with no data-service-body set. Forced off when data-query is used.
Values: "true", "false", "1", or "0"
|
| data-query | Optional |
Raw BMLT query string passed through to the server verbatim, for filters the structured
options can't express (e.g. meeting_key_value[] matching multiple values). Replaces the default service-body load entirely — data-service-body,
data-format-ids, and ?services are ignored when this is set, so the embedder controls the query end-to-end. Geolocation is forced off because
lat_val/long_val/geo_width can't safely be layered on top of an arbitrary query. page_size,
get_used_formats=1, and lang_enum are appended automatically if you don't include them, so meetings + formats still arrive in a single round-trip.
Example: data-query="meeting_key=location_nation&meeting_key_value[]=USA&meeting_key_value[]=US"
|
| data-update-url | Optional |
Show an "Update Meeting Info" link at the bottom of every meeting detail panel, pointing at a URL template you control. The template is expanded per meeting using
the tokens {meeting_id}, {meeting_name}, {server_url}, and {return_url} — each token's value is URL-encoded on substitution.
Designed for integration with bmlt-workflow's update form, any custom hosted form, or a mailto: link.
Unknown tokens are left intact. The link opens in a new tab. The button is hidden when the attribute is unset. See the Update Meeting Info Link section
below for examples.
bmlt-workflow: data-update-url="https://example.org/meeting-update/?meeting_id={meeting_id}"
|
| data-show-formats | Optional |
Show a comma-separated list of format codes (e.g. C, O, BT) beneath each meeting name in the list/cards. C (Closed) and
O (Open) are pinned to the front; remaining codes are alphabetized. Takes precedence over CrumbWidgetConfig.showFormats. Default:
false.
Values: "true", "false", "1", or "0"
|
| data-inline-formats | Optional |
Comma-separated format key strings (e.g. M,W) highlighted inline next to each meeting name in the list/cards. Each matching format renders its
localized name (e.g. "Women") as a muted suffix — a curated highlight for special-interest meetings, independent of data-show-formats. Takes precedence over
CrumbWidgetConfig.inlineFormats. Opt-in: defaults to "" (none). Note that BMLT format key strings vary by server, so a code only shows where the
server actually uses it.
Example: data-inline-formats="M,W"
|
| data-formats | Optional |
Lock the widget to meetings matching one or more format key strings (e.g. O, BT). Comma-separated. Filtering is applied client-side
after fetch. Takes precedence over CrumbWidgetConfig.formats; overridden by the ?formats= query parameter. Default: "" (no lock).
Example: data-formats="O"
|
| data-geolocation-radius | Optional |
Fixed or auto search radius for Near Me. A positive number sets a fixed radius in miles/km. A negative integer uses BMLT auto-radius
(e.g. -50 finds ~50 nearby meetings). Takes precedence over CrumbWidgetConfig.geolocationRadius. Default: -50.
|
| data-distance-options | Optional |
Comma-separated distance values (in distanceUnit) shown in the Near Me dropdown. Takes precedence over CrumbWidgetConfig.distanceOptions.
Default: 5,10,15,25,50,100.
Example: data-distance-options="5,10,25"
|
| data-distance-unit | Optional |
Unit used for distance display. Takes precedence over CrumbWidgetConfig.distanceUnit. Default: auto-detected from locale.
Values: mi or km
|
| data-language | Optional |
Override the UI language. Takes precedence over CrumbWidgetConfig.language. Defaults to navigator.language, falling back to English.
Example: data-language="fr"
Supported codes: en, es, fr, de, pt, it, sv, da, el, fa, pl, ru, ja
|
| data-dark-mode | Optional |
Dark color scheme. Takes precedence over CrumbWidgetConfig.darkMode. Default: false.
Values: auto (follow OS preference), true / 1 (force dark), false / 0 (force light)
|
| data-height | Optional |
Fixed widget height in pixels. Takes precedence over CrumbWidgetConfig.height. Omit for natural content height.
Example: data-height="600"
|
| data-hide-header | Optional |
Hide the "Meeting Finder" title bar and meeting count at the top of the widget. Takes precedence over CrumbWidgetConfig.hideHeader. Default: false.
Values: true, false, 1, or 0
|
| data-now-offset | Optional |
Minutes of grace period before a meeting is considered past. Meetings that started within the last nowOffset minutes still appear at the top; older ones roll
to the end of the list. Takes precedence over CrumbWidgetConfig.nowOffset. Default: 10. Set to 0 to roll over immediately.
|
Global Config Object
Define CrumbWidgetConfig as a global variable before loading the script. Most options can also be set as data attributes — the attribute always takes precedence over the corresponding config value. CrumbWidgetConfig is still the only way to configure map (tile providers and custom markers) and is useful when you need to set config from server-side code rather than the HTML element.
<script>
  var CrumbWidgetConfig = {
    view: 'map'
  };
</script>
<script src="https://cdn.aws.bmlt.app/crumb-widget.js"></script>| Property | Type | Description |
|---|---|---|
| view | 'list' | 'map' | 'both' |
Override the default view. Takes precedence over data-view. 'both' shows a fixed-height map above the full meeting list; the list/map toggle is hidden.
|
| language | string |
Override the UI language (e.g. 'es', 'fr'). Defaults to navigator.language, falling back to English. Supported: en,
es, fr, de, pt, it, sv, da.
|
| columns | string[] |
Columns to show in list view. Default: ['time', 'distance', 'name', 'location', 'address']. Takes precedence over data-columns. Omit any column name to
hide it. Available values: time, distance (only renders when geolocation is active), name, location (venue/building name),
address (street address with in-person/online badges), service_body. service_body is hidden by default — add it explicitly to show the
service body name.
|
| geolocation | boolean |
Enable location-based search: a Near Me button (auto-geolocates the user via the browser, requires HTTPS) and a Search location mode on the search
input that resolves a typed city, postal code, or address (e.g. Edgartown, MA or 02539) via OpenStreetMap Nominatim. Default: false for most
servers, true when data-server points at aggregator.bmltenabled.org with no service-body set (the unconstrained aggregator needs
a location to return useful results). If browser geolocation fails or is denied, an error is shown — no fallback load occurs. Note: serviceBodyIds
filters have no effect on location searches; results are determined entirely by proximity.
|
| geolocationRadius | number |
Controls the search radius when geolocation is used. A positive value sets a fixed radius in miles (or km, per distanceUnit) and caps the Near Me distance dropdown. A negative integer uses BMLT auto-radius mode — the server expands the search until it finds roughly that many meetings (e.g. -50 finds ~50 nearby meetings); the distance dropdown then shows all distanceOptions without a cap. Default: -50.
|
| distanceOptions | number[] |
Distance values (in distanceUnit) shown in the Near Me dropdown. When geolocationRadius is a positive number, options above it are hidden and it is appended as the last option if not already present. When geolocationRadius is negative (auto-radius), all options are shown as-is. Default: [5, 10, 15, 25, 50, 100].
|
| distanceUnit | 'mi' | 'km' |
Unit label shown next to distances in the Near Me dropdown. Default: auto-detected from the resolved locale (en-US, en-GB, en-LR,
my-MM → 'mi'; everything else → 'km'). Set explicitly to force a unit.
|
| nowOffset | number |
Minutes of grace period before a meeting is considered past. Meetings that started within the last
nowOffset minutes still appear at the top of the list; older meetings on today's weekday roll over to the end of the list (as if they occur next week). Default:
10. Set to 0 to roll over immediately once a meeting's start time has passed.
|
| hideHeader | boolean |
Hide the "Meeting Finder" title bar and meeting count at the top of the widget. Default: false. |
| showFormats | boolean |
Show a comma-separated list of format codes (e.g. C, O, BT) beneath each meeting name in the list/cards. C (Closed) and
O (Open) are pinned to the front; remaining codes are alphabetized. Equivalent to the data-show-formats attribute (the attribute takes precedence).
Default: false.
|
| darkMode | 'auto' | true | false |
Built-in dark color scheme. 'auto' follows the visitor's OS preference (prefers-color-scheme); true forces dark mode regardless of OS setting;
false (default) disables it. Works alongside dark mode tiles.
|
| height | number |
Widget height in pixels. Equivalent to the data-height attribute. Omit to let the widget grow to its natural content height.
|
| formats | string[] |
Lock the widget to meetings matching one or more format key strings (e.g. 'O', 'BT', 'WC'). Filtering is applied
after the API response, so all meetings are still fetched and the format-key filter narrows the result set client-side. Multiple keys are AND-combined — a meeting must
match every listed key. Key strings are stable across BMLT servers, so this is the best option when you want server-agnostic filtering. For server-side filtering by numeric format
ID, use data-format-ids instead. Default: [] (no lock). Example: formats: ['O']
|
| inlineFormats | string[] |
Highlight one or more format key strings (e.g. 'M', 'W') inline next to each meeting name in the list/cards. Each meeting's matching format
renders its localized name (e.g. "Women") as a muted suffix — a curated highlight for special-interest meetings, independent of showFormats. Equivalent to the
data-inline-formats attribute (the attribute takes precedence). Opt-in: defaults to [] (none). Note that BMLT format key strings vary by
server, so a code only shows where the server actually uses it. Example: inlineFormats: ['M', 'W']
|
| basePath | string |
Base path for History API routing (e.g. '/meetings'). Equivalent to the data-path attribute — produces clean URLs without the # fragment. See Routing for details.
|
| query | string |
Raw BMLT query string passed through to the server verbatim. Equivalent to the
data-query attribute (the attribute takes precedence). Use this for filters the structured options can't express — e.g. meeting_key_value[] matching multiple
values, or combinations of StartsAfterH/EndsBeforeH. Replaces the default load entirely (serviceBodyIds and the numeric format lock are
ignored), and forces geolocation to false — Near Me, typed-location search, and "Search this area" are all disabled because geo params can't safely
be layered on top of an arbitrary query. page_size, get_used_formats=1, and lang_enum are appended automatically if you don't include them.
Client-side formats key filtering (see above) still applies after the fetch.
Example: query: 'meeting_key=location_nation&meeting_key_value[]=USA'
|
| updateUrl | string |
URL template for the "Update Meeting Info" link at the bottom of the meeting detail panel. Equivalent to the data-update-url attribute (the
attribute takes precedence). Tokens: {meeting_id}, {meeting_name}, {server_url}, {return_url} — URL-encoded on substitution.
Works with bmlt-workflow's update form, any custom hosted form, or mailto: URLs. The link opens in a new tab. Hidden when unset. See the
Update Meeting Info Link section below for examples.
|
| map.tiles | TilesConfig |
Custom map tile provider. Replaces the default OpenStreetMap tiles. See Tile Provider below. |
| map.tiles_dark | TilesConfig |
Alternate tile provider used when prefers-color-scheme: dark. Swaps automatically on OS theme change. See Dark Mode Tiles below.
|
| map.markers.location | MarkerConfig |
Custom map marker for meeting locations. Replaces the default NA marker. See Marker Config below. |
<script>
var CrumbWidgetConfig = {
view: 'list', // 'list' | 'map' | 'both'
language: 'en', // override UI language; defaults to navigator.language
columns: ['time', 'distance', 'name', 'location', 'address', 'service_body'],
geolocation: false, // Near Me + typed location search (defaults true on the unconstrained aggregator)
geolocationRadius: -50, // negative = BMLT auto-radius (~50 meetings); positive = fixed miles/km
nowOffset: 10, // minutes before a meeting is considered past and rolls to end
hideHeader: false, // hide the "Meeting Finder" title bar
showFormats: false, // show comma-separated format codes under each meeting name
darkMode: 'auto', // 'auto' | true | false
height: 600, // widget height in pixels
formats: ['O'], // lock to meetings with these format key strings (client-side, AND)
inlineFormats: ['M', 'W'], // highlight these format codes inline next to the meeting name (default [])
query: 'meeting_key=location_nation&meeting_key_value[]=USA', // raw BMLT query; replaces default load, disables geolocation
basePath: '/meetings', // History API base path; equivalent to data-path
updateUrl: 'https://example.org/meeting-update/?meeting_id={meeting_id}', // "Update Meeting Info" link template
map: {
tiles: {
url: 'https://tile.openstreetmap.org/{z}/{x}/{y}.png',
attribution: '© <a href="https://www.openstreetmap.org/copyright">OpenStreetMap</a> contributors'
},
tiles_dark: {
url: 'https://tiles.stadiamaps.com/tiles/alidade_smooth_dark/{z}/{x}/{y}{r}.png',
attribution: '© <a href="https://www.stadiamaps.com/" target="_blank">Stadia Maps</a>'
},
markers: {
location: {
html: '<img src="https://example.com/my-marker.png">',
width: 23,
height: 33
}
}
}
};
</script>
<script src="https://cdn.aws.bmlt.app/crumb-widget.js"></script>Language
The widget automatically detects the visitor's language from navigator.language and falls back to English. Override it with the language config property:
<script>
  var CrumbWidgetConfig = {
    language: 'es'
  };
</script>
<script src="https://cdn.aws.bmlt.app/crumb-widget.js"></script>
Language codes are matched on the base tag, so 'fr-CA' uses fr. Supported languages:
| Code | Language |
|---|---|
en |
English |
es |
Spanish |
fr |
French |
de |
German |
pt |
Portuguese |
it |
Italian |
sv |
Swedish |
da |
Danish |
el |
Greek |
fa |
Persian |
pl |
Polish |
ru |
Russian |
ja |
Japanese |
Geolocation
Defaults to true when data-server points at the BMLT aggregator (aggregator.bmltenabled.org) with no service-body set, since the
aggregator otherwise has no way to scope a search; defaults to false for every other configuration. Set geolocation explicitly in
CrumbWidgetConfig to override either default.
Enable the Near Me button with geolocation: true. When enabled, the widget also attempts to geolocate the user automatically on page load and show meetings
nearby. Requires a secure context (HTTPS).
If geolocation is denied or unavailable, an error message is displayed — there is no silent fallback to loading all meetings. This is intentional: on large servers without service body scoping, loading all meetings could return tens of thousands of results.
Service body filters have no effect on geolocation searches. When using Near Me, results are determined entirely by the user's coordinates and
geolocationRadius. If no serviceBodyIds are configured, the Near Me button cannot be toggled off — geolocation is the only data source.
The Near Me button opens a distance dropdown so users can choose how far to search. Selecting a radius applies a client-side distance filter on the already-loaded meetings — no new network
request is made when changing radius. When geolocationRadius is a positive number, the available distances come from distanceOptions capped at that value; options with no meetings in range are hidden automatically. When geolocationRadius is a negative integer (auto-radius), all distanceOptions are shown without a cap — the initial search finds roughly that many meetings, and picking a distance from the dropdown switches to a fixed radius. Use distanceUnit to display kilometres instead of miles.
While in map view with Near Me active, panning or zooming the map reveals a Search this area button at the top of the map. Clicking it reloads meetings centered on the current map viewport, using the same selected radius. The map stays at the user's position — it does not jump to fit the new results.
The search input also gains a small mode dropdown: users can switch between Filter meetings (the default — a client-side text filter over already-loaded meetings) and
Search location. In location mode, typing a city, postal code, or address (e.g. Edgartown, MA or 02539) and pressing Enter resolves the place via
OpenStreetMap Nominatim and reloads meetings near the resulting coordinates. The radius used is the last Near Me choice if any, otherwise geolocationRadius. Geocoding traffic
goes to nominatim.openstreetmap.org directly — no API key is required, but consumers should respect Nominatim's
usage policy (max one request per second, requests must include a User-Agent identifying your application — bmlt-query-client sets one by default).
<script>
  var CrumbWidgetConfig = {
    geolocation: true,
    geolocationRadius: -50,        // auto-radius: find ~50 nearby meetings (default); use positive number for fixed miles/km
    distanceOptions: [5, 10, 25, 50], // defaults to [5,10,15,25,50,100]
    distanceUnit: 'mi'             // 'mi' or 'km'; omit to auto-detect from locale
  };
</script>
<script src="https://cdn.aws.bmlt.app/crumb-widget.js"></script>
Update Meeting Info Link
Add an "Update Meeting Info" button at the bottom of every meeting detail panel by setting data-update-url (or updateUrl in the global config)
to a URL template. The widget substitutes per-meeting tokens at click time and opens the result in a new tab. The button is hidden when the option is unset, so you can opt in selectively.
Supported tokens (each value is URL-encoded on substitution; unknown {tokens} are left intact):
| Token | Value |
|---|---|
{meeting_id} |
BMLT meeting id_bigint — the canonical identifier most update forms expect. |
{meeting_name} |
Human-readable meeting name. Useful in mailto: subjects. |
{server_url} |
The configured BMLT root server URL (the data-server value). |
{return_url} |
The current page URL — useful as a back-link or audit reference in submissions. |
Example: bmlt-workflow integration
bmlt-workflow is a WordPress plugin that exposes a meeting update form via the
[bmltwf-meeting-update-form] shortcode. The form's JavaScript reads ?meeting_id= from the query string to pre-select the meeting, so the template only needs the
{meeting_id} token:
<div
  id="crumb-widget"
  data-server="https://bmlt.example.org/main_server/"
  data-service-body="3"
  data-update-url="https://your-wordpress-site.example.org/meeting-update-form/?meeting_id={meeting_id}"
></div>
<script src="https://cdn.aws.bmlt.app/crumb-widget.js"></script>
Example: mailto link
Don't have a hosted form? Point at a mailto: URL — the user's mail client opens with the subject and body pre-filled. Tokens are URL-encoded, so they're safe inside
mailto: query parameters:
<div
  id="crumb-widget"
  data-server="https://bmlt.example.org/main_server/"
  data-service-body="3"
  data-update-url="mailto:webservant@example.org?subject=Update%20{meeting_name}&body=Meeting%20ID%3A%20{meeting_id}%0AReference%3A%20{return_url}"
></div>
<script src="https://cdn.aws.bmlt.app/crumb-widget.js"></script>
Example: any custom endpoint
Any URL that accepts a meeting identifier in the query string works. The link opens in a new tab, so your endpoint can be a full page (a Google Form, an Airtable form, a custom CMS,
etc.). Pass {return_url} to give your form a back-link to the meeting page:
<div
  id="crumb-widget"
  data-server="https://bmlt.example.org/main_server/"
  data-service-body="3"
  data-update-url="https://forms.example.org/report?id={meeting_id}&name={meeting_name}&back={return_url}"
></div>
<script src="https://cdn.aws.bmlt.app/crumb-widget.js"></script>
URL Query Parameters
The ?view= query parameter sets the initial view and overrides data-view and view:
| Value | Behaviour |
|---|---|
list |
Force list view on load |
map |
Force map view on load |
both |
Show map above the full meeting list; list/map toggle is hidden |
auto |
Geolocate on load — success shows map with nearby results; failure falls back to list with all meetings |
Example: https://example.org/meetings/?view=auto
When geolocation: true is set, the widget auto-prompts on load — including for ?view=map and ?view=both. ?view=list is the explicit opt-out: it suppresses the auto-prompt so the user can still trigger it manually via the Near Me button.
Three additional query parameters override their corresponding embed configuration so a single page can be re-targeted via URL: ?services= overrides
data-service-body (comma-separated service body IDs); ?format_ids= overrides data-format-ids (comma-separated numeric format IDs, server-side filter);
and ?formats= overrides CrumbWidgetConfig.formats (comma-separated format key strings, client-side filter). All three accept an empty value to clear the
configured filter (e.g. ?formats=).
CSS Variables
The widget exposes CSS custom properties so you can theme it without touching JavaScript. Set any of these on the #crumb-widget element — only specify the ones you want to
override.
| Variable | Default | Controls |
|---|---|---|
| --bmlt-font-family | system-ui, -apple-system, sans-serif |
Widget font stack |
| --bmlt-font-size | 16px |
Base font size |
| --crumb-rem | max(16px, 1rem) |
Internal "rem unit" for text, spacing, and radius. Pinned to a 16px floor so host themes that shrink <html> can't shrink the widget; scales up when users set a larger browser default font size. |
| --bmlt-background | #ffffff |
Widget and controls bar background |
| --bmlt-text | #111827 |
Primary text color |
| --bmlt-border | #e5e7eb |
Borders and dividers |
| --bmlt-accent | #2563eb |
Active buttons, links, focus indicators |
| --bmlt-accent-light | #eff6ff |
Row hover, active filter panel background |
| --bmlt-border-radius | 8px |
Card and button corner radius |
| --bmlt-row-alt | #f9fafb |
Alternating (even) row background |
| --bmlt-in-person | #15803d |
In-person badge text |
| --bmlt-in-person-bg | #dcfce7 |
In-person badge background |
| --bmlt-virtual | #1d4ed8 |
Virtual badge text |
| --bmlt-virtual-bg | #dbeafe |
Virtual badge background |
| --bmlt-in-progress-bg | #e0e7ff |
In-progress banner and row background |
| --bmlt-in-progress-text | #3730a3 |
In-progress banner text |
| --bmlt-surface | #ffffff |
Input, button, and dropdown panel backgrounds |
| --bmlt-hover | #f9fafb |
Neutral hover state (buttons and rows not using accent) |
| --bmlt-divider | #f3f4f6 |
Internal row and list divider lines |
| --bmlt-text-secondary | #6b7280 |
Secondary / muted text (table headers, time, location) |
| --bmlt-text-muted | #9ca3af |
Very muted text (footer count, empty-state messages) |
#crumb-widget {
  --bmlt-accent: #dc2626;
  --bmlt-accent-light: #fef2f2;
  --bmlt-border-radius: 0px;
}
Dark Mode
The widget ships with a built-in dark palette. Enable it with the darkMode config option — no extra CSS required. Works alongside the
dark mode tile option.
<script>
  var CrumbWidgetConfig = {
    darkMode: 'auto'
  };
</script>
<script src="https://cdn.aws.bmlt.app/crumb-widget.js"></script><script>
var CrumbWidgetConfig = {
darkMode: true
};
</script>
<script src="https://cdn.aws.bmlt.app/crumb-widget.js"></script>To use a custom dark palette instead, override the CSS variables directly:
@media (prefers-color-scheme: dark) {
  #crumb-widget {
    --bmlt-background:     #1e293b;
    --bmlt-text:           #f1f5f9;
    --bmlt-border:         #334155;
    --bmlt-accent:         #60a5fa;
    --bmlt-accent-light:   #1a3460;
    --bmlt-row-alt:        #243044;
    --bmlt-in-person:      #86efac;
    --bmlt-in-person-bg:   #14532d;
    --bmlt-virtual:        #93c5fd;
    --bmlt-virtual-bg:     #1e3a5f;
    --bmlt-surface:        #2a3a50;
    --bmlt-hover:          #2d4060;
    --bmlt-divider:        #263244;
    --bmlt-text-secondary: #94a3b8;
    --bmlt-text-muted:     #64748b;
  }
}
CSS Helper Classes
These classes are applied internally and can also be targeted in your own CSS for further customization.
| Class | Used on |
|---|---|
| bmlt-btn-primary | Filled accent buttons — active filter chips, view toggle, Join Meeting |
| bmlt-btn-secondary | Outlined buttons — Get Directions |
| bmlt-link | Link-style buttons — Back, email contact |
| bmlt-badge-in-person | In-person venue badge |
| bmlt-badge-virtual | Virtual venue badge |
| bmlt-card | Detail section cards |
| bmlt-row | Meeting list table rows |
#crumb-widget .bmlt-btn-secondary:hover {
  background-color: transparent;
  opacity: 0.8;
}
Tile Provider
By default the map uses OpenStreetMap tiles. Switch to any
Leaflet-compatible tile provider by setting map.tiles.
| Property | Type | Description |
|---|---|---|
| url | string |
Tile URL template. Use {z}, {x}, {y} placeholders (and {r} for retina where supported). |
| attribution | string |
Attribution HTML displayed in the map's attribution control. Required by most tile providers' terms of service. |
<script>
var CrumbWidgetConfig = {
map: {
tiles: {
url: 'https://tiles.stadiamaps.com/tiles/alidade_smooth/{z}/{x}/{y}{r}.png',
attribution: '© <a href="https://www.stadiamaps.com/" target="_blank">Stadia Maps</a> © <a href="https://openmaptiles.org/" target="_blank">OpenMapTiles</a> © <a href="https://www.openstreetmap.org/copyright">OpenStreetMap</a> contributors',
}
}
};
</script>
<script src="https://cdn.aws.bmlt.app/crumb-widget.js"></script>Dark Mode Tiles
Set map.tiles_dark to use a different tile layer for visitors with prefers-color-scheme: dark. The layer swaps automatically when the OS theme changes — no page
reload needed. If omitted, the same tiles are used in all color schemes.
<script>
var CrumbWidgetConfig = {
map: {
tiles: {
url: 'https://tiles.stadiamaps.com/tiles/alidade_smooth/{z}/{x}/{y}{r}.png',
attribution: '© <a href="https://www.stadiamaps.com/" target="_blank">Stadia Maps</a> © <a href="https://openmaptiles.org/" target="_blank">OpenMapTiles</a> © <a href="https://www.openstreetmap.org/copyright">OpenStreetMap</a> contributors',
},
tiles_dark: {
url: 'https://tiles.stadiamaps.com/tiles/alidade_smooth_dark/{z}/{x}/{y}{r}.png',
attribution: '© <a href="https://www.stadiamaps.com/" target="_blank">Stadia Maps</a> © <a href="https://openmaptiles.org/" target="_blank">OpenMapTiles</a> © <a href="https://www.openstreetmap.org/copyright">OpenStreetMap</a> contributors',
},
}
};
</script>
<script src="https://cdn.aws.bmlt.app/crumb-widget.js"></script><script>
var CrumbWidgetConfig = {
map: {
tiles: {
url: 'https://api.mapbox.com/styles/v1/mapbox/streets-v11/tiles/{z}/{x}/{y}?access_token=<pk.your.access.token>',
attribution: 'Map data © <a href="https://www.openstreetmap.org/">OpenStreetMap</a>, Imagery © <a href="https://www.mapbox.com/">Mapbox</a>',
},
tiles_dark: {
url: 'https://api.mapbox.com/styles/v1/mapbox/dark-v10/tiles/{z}/{x}/{y}?access_token=<pk.your.access.token>',
attribution: 'Map data © <a href="https://www.openstreetmap.org/">OpenStreetMap</a>, Imagery © <a href="https://www.mapbox.com/">Mapbox</a>',
},
}
};
</script>
<script src="https://cdn.aws.bmlt.app/crumb-widget.js"></script>
Google Maps tiles: Google's tile API requires a session token obtained server-side (or via a short-lived client-side fetch). Because the token must be fetched before
CrumbWidgetConfig is set, you need to load https://cdn.aws.bmlt.app/crumb-widget.js dynamically after the token is ready. The example below uses the
Google Map Tiles API — you'll need a referer-restricted API key with
the Map Tiles API enabled.
<script>
(async () => {
const key = 'YOUR_REFERER_RESTRICTED_GOOGLE_API_KEY';
const { session } = await fetch(
`https://tile.googleapis.com/v1/createSession?key=${encodeURIComponent(key)}`,
{
method: 'POST',
headers: { 'Content-Type': 'application/json' },
body: JSON.stringify({ mapType: 'roadmap', language: 'en-US', region: 'US' })
}
).then(r => r.json());
window.CrumbWidgetConfig = {
map: {
tiles: {
attribution: '© Google',
url: `https://tile.googleapis.com/v1/2dtiles/{z}/{x}/{y}?session=${session}&key=${key}`
}
}
};
const s = document.createElement('script');
s.src = 'https://cdn.aws.bmlt.app/crumb-widget.js';
document.body.appendChild(s);
})();
</script>Marker Config
The map.markers.location object lets you replace the default NA map pin with any image or inline SVG.
| Property | Type | Description |
|---|---|---|
| html | string |
HTML rendered inside the marker element. Typically an <img> tag or inline SVG. |
| width | number |
Icon width in pixels. |
| height | number |
Icon height in pixels. The anchor point is set to the bottom-center of the icon. |
<script>
  var CrumbWidgetConfig = {
    map: {
      markers: {
        location: {
          html: '<img src="https://example.com/my-marker.png">',
          width: 23,
          height: 33
        }
      }
    }
  };
</script>
<script src="https://cdn.aws.bmlt.app/crumb-widget.js"></script>
Example: Basic Embed
Show all meetings on a public BMLT server:
<div
  id="crumb-widget"
  data-server="https://latest.aws.bmlt.app/main_server"
></div>
<script src="https://cdn.aws.bmlt.app/crumb-widget.js"></script>
Example: Filter by Service Body
Show only meetings belonging to service body 42 (and its children):
<div
  id="crumb-widget"
  data-server="https://bmlt.sezf.org/main_server"
  data-service-body="42"
></div>
<script src="https://cdn.aws.bmlt.app/crumb-widget.js"></script>
Example: Multiple Service Bodies
Pass a comma-separated list to include meetings from several service bodies:
<div
  id="crumb-widget"
  data-server="https://bmlt.sezf.org/main_server"
  data-service-body="42,57,103"
></div>
<script src="https://cdn.aws.bmlt.app/crumb-widget.js"></script>
Example: Default to Map View
<div
  id="crumb-widget"
  data-server="https://bmlt.sezf.org/main_server"
  data-service-body="42"
  data-view="map"
></div>
<script src="https://cdn.aws.bmlt.app/crumb-widget.js"></script>
Routing
By default, the widget uses hash-based routing for meeting detail URLs (e.g. example.com/#/monday-night-meeting-42). This works out of the box on any hosting
with no server configuration.
Pretty URLs (History API)
For clean URLs without the # fragment, add a data-path attribute with your base path:
<div
  id="crumb-widget"
  data-server="https://myserver.com/main_server/"
  data-service-body="3"
  data-path="/meetings"
></div>
This produces URLs like example.com/meetings/monday-night-meeting-42. Your server must be configured to serve the page for all sub-paths under the base path so that direct
visits and page refreshes work:
| Server | Configuration |
|---|---|
| WordPress | add_rewrite_rule('^meetings/(.*)?', 'index.php?pagename=meetings', 'top'); |
| Drupal | Set Base Path for Pretty URLs in Configuration → Web services → Crumb; the module registers the necessary route automatically. |
| Joomla | Set Base Path for Pretty URLs on the Content - Crumb plugin's options (or on the module). Combine with Joomla's Search Engine Friendly URLs + URL Rewriting options under System → Global Configuration → Site. |
| Nginx | location /meetings { try_files $uri /meetings/index.html; } |
| Apache | FallbackResource /meetings/index.html |
| Cloudflare Pages |
Add a _redirects file to your publish directory containing /meetings/* /meetings/index.html 200 (or /* /index.html 200 when serving at the root).
|
Embedding in iframes (Google Sites, etc.)
When embedding in iframe-based hosts like Google Sites, all in-widget navigation (clicking meetings, back button, sibling links) works normally. However, deep-linking to a specific meeting via URL is not supported because the widget runs inside a proxied iframe and cannot control the parent page's URL.
No special configuration is needed — the default hash-based routing works inside iframes. The data-path attribute is not needed for iframe embeds.
Features
- List view — meeting table sorted by day and time, with venue type badges
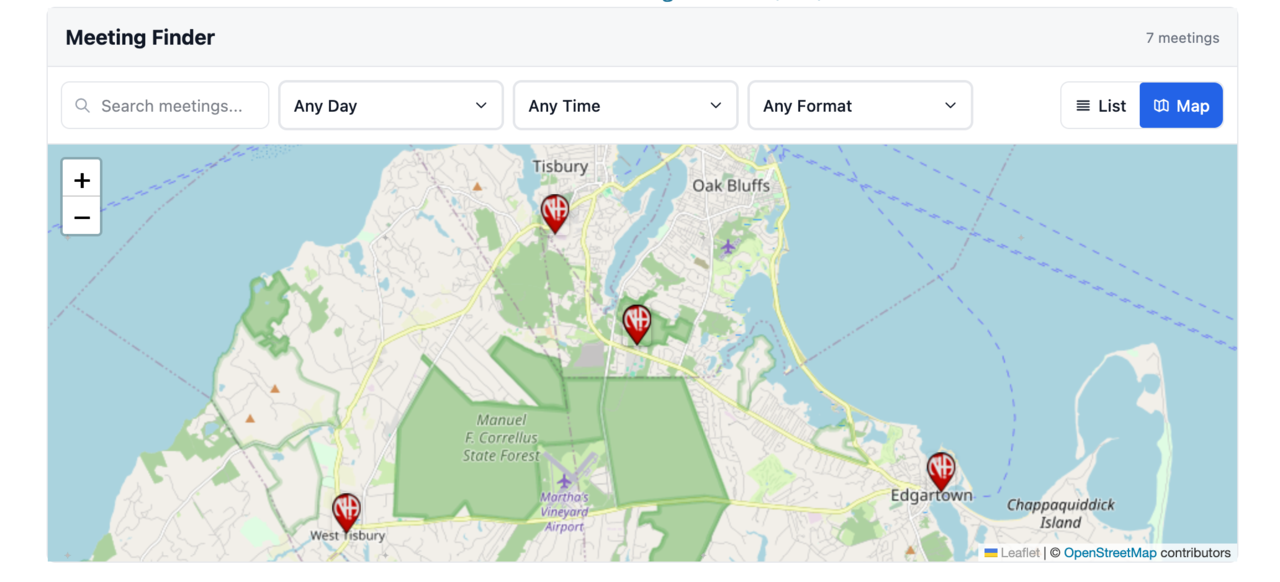
- Map view — interactive Leaflet map for in-person meetings (including those with an online component); click a marker to see meetings at that location; pan or zoom to reveal a Search this area button when Near Me is active
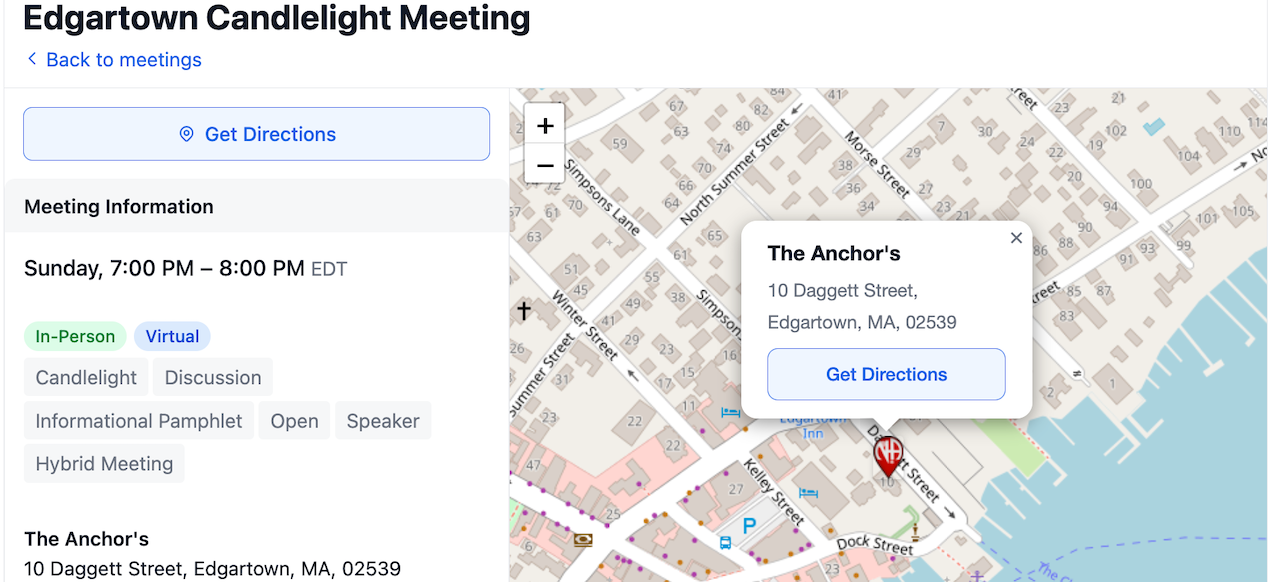
- Detail view — full meeting info: schedule, address with Google Maps directions, virtual meeting join button, formats, and notes
- Text search — real-time filter across meeting name, location, and notes
- Weekday filter — toggle individual days of the week
- Venue type filter — in-person or virtual (meetings with both an in-person location and an online link appear under both)
- Time of day filter — morning, afternoon, evening, or night
- Format filter — multi-select dropdown to filter by meeting format (e.g. Open, Closed, Speaker); shows only formats present in the loaded meeting data
- Locale-aware time display — meeting times are shown in 12-hour (AM/PM) or 24-hour format based on the user's browser locale automatically
- Recursive service body support — child service bodies are always included
- Multiple service bodies — comma-separate IDs to combine regions
- Printer-friendly list view — when the user prints the page, the widget automatically swaps to a clean black-and-white schedule grouped by weekday, repeats table headers across pages, and prints the full URL for online meetings
Browser Support
All modern browsers. Internet Explorer is not supported.
- Chrome / Edge 90+
- Firefox 90+
- Safari 14+
FAQ & Troubleshooting
Nothing is showing up — the widget area is blank
The two most common causes:
- Wrong server URL. Open
data-serverin a browser. It should load a BMLT admin page (or at least respond). Double-check the trailing path — most servers expect/main_server/at the end. - Missing container. The widget mounts into an element with
id="crumb-widget". If the ID is misspelled or the<div>is missing, nothing renders. - CORS errors. Open your browser's developer console (F12). If you see a CORS error, your BMLT server is not allowing requests from your site's domain — contact your server admin.
- Container has no height. If you set
data-view="map"ordata-view="both", the parent container needs a height. Addstyle="height:600px"to the<div>.
The map is blank or won't load
- No meetings have coordinates. The map only shows meetings with valid latitude/longitude on your BMLT server. Check the meetings in your BMLT admin.
- Tile provider blocked. If your site has a strict Content-Security-Policy, make sure tile URLs (default:
tile.openstreetmap.org) are allowed inimg-srcandconnect-src. - Geolocation denied. "Near me" search requires the user to grant location permission in their browser. If denied, the search falls back to text/postal-code search.
How do I change the colors to match my site?
Override the widget's CSS custom properties — see CSS Variables. For dark mode, see Dark Mode. You can also use one of the built-in helper themes — see CSS Helper Classes.
My service body filter shows no meetings — why?
- Wrong service body ID. The ID must be the numeric ID from your BMLT server, not the name. See Finding your Service Body ID.
- No published meetings. The service body may exist but have no active/published meetings on the server.
- Recursion is always on. Child service bodies are automatically included — this cannot be disabled. If you want only one specific body, that body must be a leaf (no children) on the server.
Can I embed this inside an iframe (Google Sites, etc.)?
Yes. Set data-router="hash" so individual meeting links use #-style URLs, which work inside iframes where the parent page controls the address bar. See Routing and the Google Sites example.
I'm still stuck — where can I get help?
- Bug or feature request: open an issue on GitHub.
- Email: help@bmlt.app.
- Community: the BMLT Facebook group.
npm Package
In addition to the CDN script-tag embed, Crumb Widget is available as an npm package for use in JavaScript/TypeScript projects (React, Svelte, Vue, plain Vite, etc.).
Installation
npm install crumb-widget leafletleaflet is a peer dependency — install it alongside crumb-widget so consumers can dedupe and pin their preferred version.
Usage
Import mountCrumbWidget and call it with a DOM element and your configuration. The widget mounts itself and injects its own CSS — no separate stylesheet import needed.
import { mountCrumbWidget } from 'crumb-widget';

mountCrumbWidget(document.getElementById('my-widget'), {
  serverUrl: 'https://bmlt.example.org/main_server/',
  serviceBodyIds: [1, 2, 3],
});
In a Svelte component, use onMount to ensure the element exists before mounting:
<script lang="ts">
  import { onMount } from 'svelte';
  import { mountCrumbWidget } from 'crumb-widget';

  let widgetEl: HTMLDivElement;

  onMount(() => {
    mountCrumbWidget(widgetEl, {
      serverUrl: 'https://bmlt.example.org/main_server/',
      serviceBodyIds: [1, 2, 3],
    });
  });
</script>

<div bind:this={widgetEl} id="crumb-widget" style="height:600px"></div>
Options
All options from Global Config are available, plus two additional required fields:
| Option | Type | Required | Description |
|---|---|---|---|
serverUrl |
string |
Yes | URL of the BMLT server. |
serviceBodyIds |
number[] |
No | Service body IDs to filter by. Omit or pass [] to show all. |
view |
'list' | 'map' | 'both' |
No | Initial view. Defaults to 'list'. 'both' shows map above list with no toggle. |
geolocation |
boolean |
No | Enable Near Me + typed location search (city, zip, address). Defaults to false, except true when serverURL is the aggregator with no serviceBodyIds. |
geolocationRadius |
number |
No | Search radius. Positive = fixed miles/km (caps the distance dropdown). Negative integer = BMLT auto-radius: find ~N nearby meetings (e.g. -50). Defaults to -50. |
distanceOptions |
number[] |
No | Distance values shown in the Near Me dropdown. Defaults to [5,10,15,25,50,100]. |
distanceUnit |
'mi' | 'km' |
No | Unit label for distances. Auto-detected from the resolved locale when omitted (e.g. en-US → 'mi', de-DE → 'km'). |
darkMode |
false | true | 'auto' |
No | Dark mode setting. Defaults to false. |
language |
string |
No | BCP-47 language tag (e.g. 'es'). Defaults to browser locale. |
columns |
Column[] |
No | Table columns to display. See Global Config. |
nowOffset |
number |
No |
Minutes of grace period before a meeting is considered past. Defaults to 10; set to 0 to roll over immediately.
|
hideHeader |
boolean |
No | Hide the "Meeting Finder" title bar and meeting count. Defaults to false. |
showFormats |
boolean |
No |
Show a comma-separated list of format codes (e.g. C, O, BT) beneath each meeting name in the list/cards. C (Closed) and O (Open) are pinned
to the front; remaining codes are alphabetized. Defaults to false.
|
height |
number |
No | Fixed widget height in pixels. Omit for natural height. |
formats |
string[] |
No |
Format key strings (e.g. ['O', 'BT']) to lock the widget to. Client-side filter after fetch. Use serviceBodyIds-style numeric filtering via the widget's
data-format-ids attribute for server-side filtering.
|
inlineFormats |
string[] |
No |
Format key strings (e.g. ['M', 'W']) to highlight inline next to each meeting name in the list/cards. Each meeting's matching format renders its localized name (e.g.
"Women") as a muted suffix. Opt-in: defaults to [] (none). Note that BMLT format key strings vary by server.
|
basePath |
string |
No |
Base path for History API routing (e.g. '/meetings'). Produces clean URLs without the # fragment. Equivalent to the data-path attribute.
|
updateUrl |
string |
No |
URL template for the "Update Meeting Info" link on the meeting detail panel. Supports {meeting_id}, {meeting_name}, {server_url},
{return_url} tokens (URL-encoded). Works with bmlt-workflow, hosted forms, or mailto: URLs.
|
map |
object |
No | Tile provider and marker config. See Tile Provider. |
leaflet is a peer dependency (install it alongside crumb-widget) so you
can dedupe with any other Leaflet-using code in your app. Each call to mountCrumbWidget is independent, but multiple widgets on the same page are not currently supported.
Philosophy
This project aims to cover the needs of most NA service bodies well — not every possible use case. It is intentionally kept simple and focused. New features are weighed against the cost to the codebase; niche requests that bloat the project for everyone are generally out of scope. If you need deep customization, this may not be the right tool.
Acknowledgements
Crumb Widget owes a great deal to the work of the Code4Recovery community, and in particular to tsml-ui — a React-based meeting finder that inspired many of the UX patterns and solved many of the same real-world problems. Crumb Widget exists precisely because BMLT's data model differs enough from tsml-ui's assumptions that it needed a first-class UX of its own rather than a shoehorned fit. If you're not running a BMLT server, tsml-ui is what you should be using.